Corn and Cranberry Investigation Tray

While getting ready for Thanksgiving and putting away Halloween stuff, my kids were asking about the Indian corn we use as decor at this time of year.  They wanted to see if it was different from the corn we use to make popcorn.  That got them interested in popcorn as well.  Since I was making cranberry sauce, my kids took some cranberries to study as well.  Hence, this Corn and Cranberry Investigation Tray was created.

Here’s what you’ll need to get started:

  • Popcorn kernels
  • Popcorn
  • Indian Corn
  • Fresh cranberries
  • Dried Cranberries
  • Magnifying glasses
  • Glass of water

Set up the tray with all the materials.  I also added some cut cranberries for my little ones to see how the inside looks like.

The kids loved the Indian Corn and enjoyed examining the different colors and picking them off the cob!  My middle son is super crafty and used the kernels to make art projects.  I had kernels everywhere!

Next, we compared the popcorn kernel and the popcorn to each other.  We could see the bits of kernel in the popcorn.  Since we have an air popper at home, we talked about how kernels get heated up and turn into popcorn.

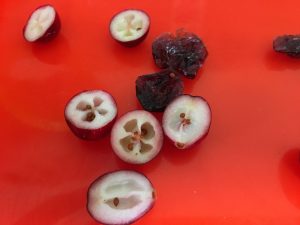
We compared the dried cranberries to the fresh cranberries and were also able to see the seeds inside both of them.

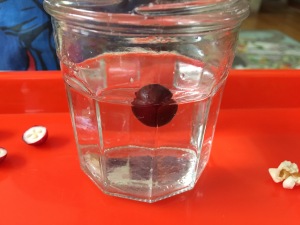
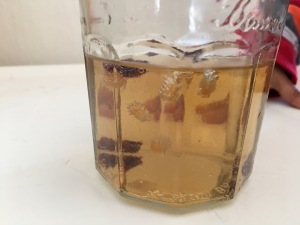
Kids love to add things to water so, of course, I brought out some water for them to test what floats and what sinks.  First we started with cranberries.  Here’s a whole cranberry.

Next we added dried cranberries and cut cranberries.

We discussed why the fresh cranberry floated and why the dried ones didn’t.  My older kids were able to figure out that the air pockets kept the fresh cranberry afloat.

Next we tested the popcorn and kernels.

We used similar reasoning for why the popcorn floated but the kernel sunk.

Lastly, they just started dumping everything into the cup because, well, it’s fun!

This was perfect for toddlers and preschoolers.  You don’t need much to keep the little ones entertained.  But my older sons (ages 6 and 8) were interested in it too.

Extension: If you have some carbonated beverages that are clear, such as Ginger Ale, Sprite, 7up, etc… you can test how the fresh cranberries, dried cranberries, popcorn and corn kernels behave with bubbles!  Visit my post Hopping Corn and Cranberries for the bubbly details!

Another idea, which I have not tried, might be to leave a fresh cranberry out and see how it shrivels up and compare it to a dried cranberry.  If you try this, let me know in the comments!

The Science Behind the Activity:

Investigating different textures and seeing changes in objects are a great way to discuss cause and effect with little ones.  Most of them have eaten dried cranberries and popcorn but have no idea where they come from.

By adding the objects to water, they can learn to make predictions about which objects float and sink in water.  For older children, they can investigate how air pockets in cranberries (and other fruits) allow them to float even though they “feel heavy”.  For even older kids, you can bring up the concept of density.

Thanksgiving STEAM Teepee building

Often I feel as though Thanksgiving activities get lost in the middle of Halloween and Christmas.  Here’s a simple STEAM activity that can be tailored for the littlest ones as well as for older ones.  The method I have in this post is just ONE of many ways that you could present this activity to your superheroes.

Here’s what you need to get started:

  • Brown construction paper (great for little ones)
  • Sticks (real ones or craft sticks, depending on the age of your kiddos)
  • Thanksgiving stickers (we used leaves)
  • Pilgrim and Native American figures (We found a fun kit at Michael’s)
  • Glue
  • Scissors

Since the tots in my class are pretty young (ages 2-3), I provided them with brown construction paper and helped them to roll into a cone.

I left a box of craft sticks out for them in case they wanted to try to use them instead.  Some taped them on to the outside of their Teepees.

Some looked like tents.

The tots then added stickers and craft sticks to the cone to make it look like a Teepee.

All of them looked great!

Using the kit, each child selected either a Pilgrim or Native American and added it to their Teepee or used them to play with.

Pretend Play with their Teepees further extends this activity!

The Science behind the Activity:

This is a simple open-ended STEAM activity that allows children to build a structure using basic supplies.  The challenge is getting it to stand on its own.  Add some specifications to the structures for older kids, such as a height, width, number of sticks, etc…  Adding the Pilgrims and Native American figures also encourages pretend play.  Read a book about Thanksgiving to round out the lesson with a bit of history.

This activity can be modified for any holiday, such as Santa’s Toy Factory, Witch’s Hut, Leprechaun Trap, etc…


Hopping Corn and Cranberries

Just in time for Thanksgiving, I’ve got a fun quickie experiment to do with your cranberries and some popcorn kernels.  If you’ve tried my Dancing Raisins experiment, then this will be familiar.

Here’s what you’ll need to get started:

  • Dried Cranberries
  • Popcorn kernels
  • Soda water, Ginger Ale, Sprite, Club Soda, sparkling water or whatever clear bubbly (kid-friendly!) you have at home
  • clear jars or cups

img_9289

I asked the tots to touch the dried cranberries and the popcorn kernels and describe how each felt.

img_9290img_9291

For younger tots, I prompted them with simple questions such as:

  • Is it soft or hard?
  • Is it smooth or bumpy?
  • Is it sticky or slimy?

Fill one cup with water and one cup with soda (we used diet Ginger Ale because that’s what we have at home), but any clear bubbly soda should work fine.

img_9298

We also compared the difference between the soda and the water.  They immediately noted the difference in color and the presence of bubbles in the soda.

img_9292 img_9300

Next, I asked them what they thought would happen if the cranberries were added to the water? They all thought they would sink to the bottom.  After making their predictions, they added the cranberries to test their theories.

img_9295

Yes, the cranberries sunk to the bottom.

I then asked them what they thought would happen if the cranberries were put in the soda.  They again thought that they would sink.

img_9302

So they did sink… at first.  But then they “hopped” to the surface… and then dropped again… and rose again.

We repeated the same steps with the popcorn kernels.  When we added the popcorn kernels to the water, they sank as well.

img_9297

Then we added them to the Ginger Ale.  And discovered that the popcorn kernels did the same thing!

img_9303

It was mesmerizing to watch them “hop” up and down.

We will definitely be trying this again with several other sodas and sparkling water!  You can also make a bubbly solution with vinegar and baking soda as well.

Another extension/variation of this experiment is to try out different items, other than cranberries that might behave in a similar way, such as raisins, dried macaroni, etc…  Search your pantry.  The options are endless.  Happy Hopping!

Also, try my Dancing Raisins experiment for a different twist to a similar activity!

The Science behind the Activity:

This is a great experiment demonstrating sinking and floating.  Cranberries are denser than the liquid so they initially sink when you put them in.  As the carbon dioxide gas bubbles attach to the surface of the cranberries, they decrease the density of the cranberry and the cranberry floats to the top (dances and shimmies its way to the top!) At the surface of the liquid, the gas bubbles pop and the cranberry sinks back down.  The process keeps repeating until there isn’t enough carbon dioxide left to raise the cranberries.  The same holds true for the popcorn kernels.


Cranberry Science

It’s almost Thanksgiving and it’s time to make the cranberry sauce and why not throw in a quick bit of science while the kids help you make the sauce?  Cranberry sauce is quick and easy to make at home and we took some time to explore some fun with cranberries.  (When I mentioned this to my mother, she groaned and said, “Why do you have to find science in everything?”  To which I replied, “Because science is in everything we do!”)

Here’s what you need to get started:

  • fresh cranberries
  • dried cranberries
  • glasses (I used some old jam jars)
  • ginger ale (or any carbonated clear drink)
  • knife (for adult use only)IMG_4174

Fresh vs. Dried Cranberries:

I had the boys compare the dried and fresh cranberries.  They held it in their hands and noticed that the fresh ones were round, smooth, shiny and hard.  The dried ones were “bendy”, wrinkled, bumpy and darker in color.  Then they tasted them.  You should have seen my son’s face when he tasted the fresh cranberries! (He spit it out so quickly that I couldn’t get a picture!)

IMG_4176

Then I asked them what they thought would happen if we put both kinds of cranberries in water.  My middle son guessed that they would both sink.

IMG_4178 So, why do the fresh cranberries float and the dried cranberries sink?  We decided to cut a fresh cranberry open to see if that might give us any clues.

IMG_4180 Aha! If you look closely, you can see that cranberries are filled with air pockets.  This allows them to float in water.  The dried cranberries don’t have any air in them and so they sink.

IMG_4182

My eldest son decided to keep a record of our experimentation and our results.

IMG_4198

After observing the cranberries in the water, my middle son wondered if the cranberries would “dance” in soda like raisins do.  (Check out my “Dancing Raisins” and “Hopping Corn and Cranberries”  5-minute activities to see what he’s referring to.  Super easy and perfect for the holidays when there’s plenty of soda around!)

So, of course, I grabbed a can of ginger ale and we added fresh cranberries and dried cranberries and observed what happened.

IMG_4183

The cranberries DID dance, but not the same way as the raisins did.  I LOVE that my son was able to make the connection to an experiment we did awhile ago.  I guess they DO pay attention to their mom… sometimes.

IMG_4186

Making Cranberry Sauce:

Tomorrow is Thanksgiving and I asked my sister-in-law if I could make the cranberry sauce, specifically so I could justify buying a bag of fresh cranberries to use to investigate.  So, I had my middle son help me make the sauce.  Measuring  is a great math skill and pouring and mixing carefully are great to develop fine motor skills.  I try to include my kids in cooking/baking whenever I can, even if it takes me 3 times as long to complete my task.

IMG_4191_2

The fun part came when we added the cranberries to the sugar/water mixture.

IMG_4192

As my son mixed, he heard some “popping” sounds.  As we looked carefully at the pot, he noticed the cranberries were “exploding”.

IMG_4193

So I asked him why that might be happening.  This was a great way to bring back the concept that cranberries are filled with air pockets and when the air heats up, they have to get out of the cranberries so they “explode”.

He also noticed the sauce getting thicker and not so watery.  We talked about how the water was evaporating into steam and the cranberries were also helping to thicken up the sauce.

IMG_4195

And now we’re ready for some turkey to go with our sauce!  Happy Thanksgiving!

The Science behind the Activity:

Who would have thought there was so much learning to be had from cranberries? Cooking/baking are great ways to expose children to how things can change when heated up, mixed, etc…  It’s a great time to bring in math concepts such as measuring and for the little ones, fine motor skills such as pouring and mixing.

Comparing the dried and fresh cranberries brings in the concept of observing changes and comparing/contrasting different items.  By cutting open the cranberry, we were able to explain why fresh cranberries float in water.


Mayflower Boats

Here’s a super easy craft that you can make with your kids that also allows for some science exploration.  I call these Mayflower Boats because we made them during Thanksgiving, but really you could adapt this for anytime of the year.  There are SO many ways you can use these little boats and so much learning to be had.  I had a chance to do this with my son’s class and the kids had a BLAST!  So grab a few supplies and let the kids busy themselves while you get some of that Thanksgiving cooking done!

Materials Needed per boat:

  • 2-3 wine corks  (If you are a parent, I’m SURE you can easily go through a bottle or 2 of wine on those “trying” days!)
  • 1 rubber band
  • coffee stirrer, wooden skewer, or craft stick
  • paper, cardstock or foam sheet to make the sails
  • scissors
  • glue
  • Straw
  • Bin with water (we added blue water color for fun)

IMG_4035

To make the Boat:

Place a rubber band around 2 to 3 pieces of cork to make the base of the raft.

IMG_4102

Using white paper, card stock or foam sheets, cut out sails to make it look like the Mayflower (for Thanksgiving) or any shape you want at other times of the year.  Attach them to the mast with glue.  Allow the glue to dry.

IMG_4103 IMG_4105

Add a a craft stick or coffee stirrer to create the mast.  We just tucked ours in between 2 pieces of cork but you could certainly use a wooden skewer to stick it into the cork to make it more secure.

IMG_4107

Voila! There’s your little Mayflower boat.  Now it’s time for some science exploration!

IMG_4101

To explore with the boats:

We talked briefly about the pilgrims who journeyed across the ocean from England to America on the Mayflower.  I told them that our boats represented the Mayflower and the Bin with water represented the ocean that they traveled across. (You can totally omit this for a non-Thanksgiving lesson)

I then gave each child their own bin with blue water (yes, I added blue watercolor because colors make everything more fun!) and had them place their boats in and explore.

IMG_4036_2

Immediately the kids used their hands to make waves, dropped their boats from up high and watch them splash in the water and still float.  Some noticed that their boats floated upside down.

IMG_4049_3

Then I gave them straws to blow on the sails to make the boats move.  What i didn’t anticipate (and I obviously should have) was that the kids put the straws in the water and started blowing bubbles because “bubbles make waves happen”, according to one little guy.

IMG_4044

Oh the storms and waves and hurricanes that they created.  And loads of splashing and giggling.

IMG_4050

Since we are in the middle of a sever drought in California, we weren’t able to use water and rain gutters to do races and explore the effect of an incline on the speed of the boats.  But that would be a fantastic extension for this activity!

You could also have the kids race their boats across a large tub of water, in the bathtub or in a small wading pool.  Again, due to our drought, none of these were possible for the class.

IMG_4051

Science behind the activity and Extensions:

This activity is great for investigating and exploring. “What happens if I…?” is the best part of this activity.  By blowing on the sails, the kids can see how the wind can “push” a boat along.  For older kids, you can certainly introduce Newton’s Laws of motion to explain how the boat moves.  You can even introduce simple weather concepts and see how they affect the movement of the boat from a windstorm to waves to whirpools, etc… There are so many extensions for this activity.  Encourage your kids to test out different materials for the boat (craft sticks, styrofoam, plastic cups, clay, etc…) or different materials for the sails (paper, foam, felt, etc…).

For more details and to see where I got my ideas from click on the 2 links below.  I merged the 2 activities together to create this one.

http://www.fantasticfunandlearning.com/mayflower-craft-and-science-activity.html

http://www.science-sparks.com/2015/02/21/materials-make-best-boat/

For another fun boat activity, check out What Floats Your Boat? on my Density/Floating page.