Simplified Ocean Zones in a Bottle (3 Zones)

If you’ve ever tried the liquid layers in a jar, here is a great twist for showing your superheroes the layers in the ocean.  This is the simplified version of Ocean Zones in a Jar but has only the top 3 ocean zones (layers) where much of the well-known marine life exists.  It is also easier for the youngest superheroes to do.

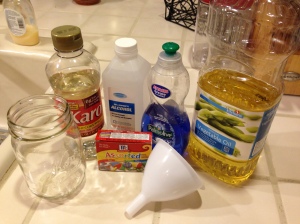
Here’s what you’ll need to get started:

  • Light Karo syrup (corn syrup) – tinted black or dark purple OR Dark Karo Syrup (no tinting needed)
  • Water tinted light blue
  • Vegetable oil – tinted blue-green (if possible)
  • Dropper
  • Funnel
  • food color (or liquid watercolors)
  • empty water bottle

IMG_5336

First add about 2-3 inches of corn syrup to the bottle.  Add some black/dark purple color to it and mix well.  (For my Tiny Tot class, I tried the dark Karo syrup and it worked great since we didn’t have to tint it black) This represents the deep ocean zone known as the Midnight Zone

IMG_5337

Carefully add the blue water on top (don’t tint it too dark) until you have about the same thickness as the corn syrup.  You should see the 2 distinct layers.  This represents the Twilight Zone of the Ocean.

IMG_5338

The top layer is the oil.  Food color and watercolor will not dissolve in oil since they are water based and oil and water don’t mix.

Regular food color will NOT mix with oil

Regular food color will NOT mix with oil

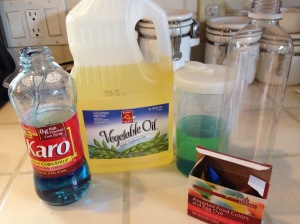
For this layer, you have 2 options: leave it yellow OR if you have candy food color (oil-based food color) then you can use that to tint the oil.

IMG_1666

Either way, you will definitely get a distinct layer on top of the water.  I used the candy color to get a greenish-bluish color.

Oil-based candy color WILL mix with oil

Oil-based candy color WILL mix with oil

This layer represents the Sunlight Zone, the part of the ocean where most marine life exist.

IMG_5339

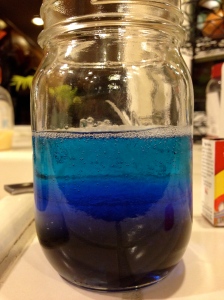
All done!  You can also add labels to the outside of the jar to show your superheroes the layers.

IMG_5340

Visually you can see how the layers (ocean zones) get darker as you go deeper.   You can discuss with your little ones what effect this might have on the marine life that lives in each layer.

Extension: This activity goes really well with my Exploring Life in the Ocean Zones activity.

Extension for older kids: For older kids with a bit more hand control (and less likely to shake the bottle!) try the full version of Ocean Zones in a Jar  with all 5 layers of the Ocean.

The Science behind the Activity:

There’s all sorts of awesome science in this activity!  This is a great visual representation of how the layers of the ocean have varying amounts of light reaching them.  This can open up an entire discussion of why there are so many more organisms in the Sunlight Zone and the Twilight Zone versus the Midnight Zone.  You can even research what types of organisms exist in each layer.

In reality, there are 2 more zones below the Midnight Zone: the Abyss and the Trench.  For obvious reasons, there aren’t many known organisms that live there.  And the ones that do are unfamiliar to young children.  But for older children, it would be great to show them how deep the ocean really goes.

The other awesome science in this activity has to do with the different densities of various liquids.  Liquids that are more dense (more mass per volume) will sink and liquids will lower densities will float on top of denser ones.  If you have ever tried to mix oil and water, well, you know why that won’t work because oil is less dense than water.  This is why you have to shake your favorite salad dressings before pouring.

Here’s where I got my original idea from and then I shortened it to make it easier for toddlers and preschoolers: http://www.icanteachmychild.com/make-ocean-zones-jar/


Ocean Zones in a Jar

If you’ve ever tried the liquid layers in a jar, here is a great twist for showing your superheroes the layers in the ocean.  This activity definitely requires some help from an adult to do but my preschoolers really enjoyed watching the layers stack on top of each other.  Older kids will love doing it on their own. ( I also have Simplified Ocean Zones in a Bottle for the youngest superheroes as the layers in this one can get tricky at the end.)

Here’s what you’ll need to get started:

  • Light Karo syrup (corn syrup) – tinted black or dark purple OR Dark Karo Syrup (no tinting needed)
  • Blue dish soap
  • Water tinted light blue
  • Vegetable oil – tinted blue-green (if possible)
  • Rubbing alcohol (91% works best)
  • Dropper
  • Funnel
  • food color (or liquid watercolors)
  • glass jar (I used a pint sized glass jar)

IMG_1658

First add about 1-1.5 inches of corn syrup to the jar.  Add some black/dark purple color to it and mix well.  (For my Tiny Tot class, I tried the dark Karo syrup and it worked great since we didn’t have to tint it black) This represents the deepest ocean zone, the Trench.

IMG_1659

Carefully add the blue dish soap on top of the corn syrup layer.  The layers should not mix.  This second layer represents the Abyss.

IMG_1660

Next carefully add the blue water.  Don’t tint it too dark.  The water layer should sit right on top of the dish soap creating 3 distinct layers. The water layer represents the Midnight Zone of the Ocean.

IMG_1661

The next layer will be the oil.  Food color and watercolor will not dissolve in oil since they are water based and oil and water don’t mix.

Regular food color will NOT mix with oil

Regular food color will NOT mix with oil

For this layer, you have 2 options: leave it yellow OR if you have candy food color (oil-based food color) then you can use that to tint the oil.

IMG_1666

Either way, you will definitely get a distinct layer on top of the water.  I used the candy color to get a greenish-bluish color.

Oil-based candy color WILL mix with oil

Oil-based candy color WILL mix with oil

This layer represents the Twilight Zone.

IMG_1667

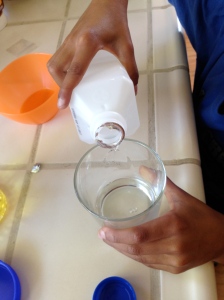
The last layer is a bit tricky.  The rubbing alcohol to use should be 91%.  The 50% definitely didn’t work and the 70% was not too successful either.  We poured some rubbing alcohol into a cup first.

IMG_1668

Use a dropper to slowly add the rubbing alcohol  by touching the edge of the jar so that it drips down the side.  Be careful not to let it break through the oil layer or else it will mix with the water.  It will be slow-going but will slowly reveal a clear layer on top of the oil layer.  This layer represents the Sunlight Zone, the part of the ocean where most marine life exist.

IMG_1672

All done!  You can also add labels to the outside of the jar to show your superheroes the layers.

Visually you can see how the layers (ocean zones) get darker as you go deeper.  From the picture it is hard to tell that the layers are getting darker at the top (the oil looks darker than it actually is). You can discuss with your little ones what effect this might have on the marine life that lives in each layer.

The Science behind the Activity:

There’s all sorts of awesome science in this activity!  This is a great visual representation of how the layers of the ocean have varying amounts of light reaching them.  This can open up an entire discussion of why there are so many more organisms in the Sunlight Zone and the Twilight Zone versus the Abyss and the Trench.  You can even research what types of organisms exist in each layer.

The other awesome science in this activity has to do with the different densities of various liquids.  Liquids that are more dense (more mass per volume) will sink and liquids will lower densities will float on top of denser ones.  If you have ever tried to mix oil and water, well, you know why that won’t work because oil is less dense than water.  This is why you have to shake your favorite salad dressings before pouring.

Here’s where I got my idea from: http://www.icanteachmychild.com/make-ocean-zones-jar/
Extension: This activity goes really well with my Exploring Life in the Ocean Zones activity.